
If you plan to have a go at these guys, you’ll need some time on your hands. I’m not even joking.
Well, I’m pretty pleased with myself.
This all started when I realised I needed to up my earring game. It’s not a cheap game to up however, unless you make your own. I felt this was a challenge I was more than certainly up to. At the same time I had some pretty stitch markers and I decided that I needed more of those too. And the game was afoot!
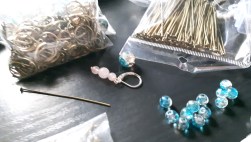
You’re going to need yourself some specialist equipment for this next trick. Some jewellery making pliers (Round nosed, chain nosed and some wire cutters), some beads or even Swarovski Crystals or beads of your choice (usually quite cheap at craft suppliers), some headpins to put the beads on, some jump rings, some chain and some earring fixings. I chose Kidney ear wires for the earrings and leaverback earwires for the stitch markers.


The Method.
Ok, so first things first. The hard part, putting the beads onto the headpins and creating a loop.

Looks all cute and innocent sitting there doesn’t it?! Not so much. I’ve taken pictures, because I find them easier. If you can already do this bit, feel free to move on to the good stuff!


So you put your bead or beads onto the pinhead. You bend it at a 90 degree angle where you want the loop to start with the chain nosed pliers, this is easier before cutting the length, I tried both ways! then you cut off the extra, leaving enough to make the sized loop you want. This is all hit and miss, there might be some magical mathematical way of working it all out, but I didn’t use that. I just knew one side of the round nosed pliers was thinner than the other, so you can always go further up the pliers or even switch sides. Now this next bit is key, you need to hold the end of the wire with the round nose pliers (obviously you’d be holding the bead too, but I was taking a picture at this point.)
YOU NEED TO HAVE YOUR HAND UPSIDE DOWN like this so that you can bend the wire all the way back around in some smooth twist, if possible…either way this is the easiest way to start the twist even if you stop half way through. As you practice, you’ll hopefully pick up speed.
PLEASE NOTE!
If you’re adding this bead or bead selection right onto an earring back without the use of the jump rings, please do that BEFORE you start to twist, just let it hang out with the bead(s) until you’re part way through the twist, then you just let it slide along the wire until it’s inside the middle of where the loop will be and then you close it up.


At this point, you can probably work out the rest, but I’ll talk you through what I did.
The Stitch Markers.
Easy as.
3 beads onto the pinhead, 90 degree angle, snip off excess, add leaverback earwire, start the twist, pause, slide leaverback into start of loop, complete twist and DONE!
Have some pictures:


The Earrings.
These guys took all the time, I’m telling you.
I started with two 18 link bits of chain and added a small jump ring to the top. Next I headpinned and looped 14 paler yellow Swarovski crystal beads, 10 darker ones and 6 red ones. I took 7 of the paler ones and added them to the chain, then I added 5 darker ones. I ended up removing 10 links of the chain and adding the 3 red ones to a larger jump ring and putting them on the last link. I placed the first lot where they looked good, then I had to work out what I’d done for the second one. I tohught I could do this as I went along, but I kept loosing myself and got it wrong a few times, so I laid the first one on my finger and wrote it down. Here’s my pattern if you’re interested.
First loop has the jump ring for the earring back and has 2 pale yellows attached, one either side.
Second loop has 2 pale yellows attached, one either side.
Third loop has 2 pale yellows attached, one either side.
Fourth loop has 1 dark on one side, with a second dark hanging from it’s jump ring.
Fifth loop has 1 pale yellow
Sixth loop has 1 dark on the opposite side to the fourth hoop, with a second dark hanging from it’s jump ring.
seventh loop has 1 dark
Eighth hoop has the larger jump ring with the 3 reds.
Then I slipped them onto Kidney wire earring hoops and they were done!
some pictures:


CONCLUSION:


The stitch markers were far easier, but then I was only doing the snip and loop once, not 15 times, then opening and closing various jump loops. I can’t tell you how many jump loops I’ve lost. I don’t know! I quite like the earrings though – even though they’re not in my colour! I’m not keeping them, so that’s alright.
Apparently the Swarovski’s would shine better on a silver base, rather than the ‘aged bronze’ I have used, but I don’t have silver. They are also very delicate too so be careful! They’ve sort of put me off making any more for a little, not until I have more time! And I may just see if I can find a pattern, making them up is hard.
Still, pretty pleased with what I’ve done, and they’re all off to charity so that’s extra pleasing.
Go me!
Have you made and earrings? Do you have any tips or ideas?
Please let me know in the comments!


These are really cute. I was looking for stitch markers I could use for crochet for the longest time. I could only find knitting ones but I wanted the ones where I could open them up. I never thought of making them myself. You’ve made some beautiful things here, Paein!
Thank you! Glad I’ve given you ideas