


So. due to our totally sane bank holiday system here in the UK, today is sort of mayday and so I thought I’d craft accordingly! Well, in a semi related way anyway…. These are inspired by pins, one tutorial, one picture and then I just messed with paper and shapes and glue…
So these are the two pins I used for these flowers, I’ll explain how as I run through what I did. They’re both hyper linked to the original pin, which is likely linked to the pictures origins.


I made 4 flowers total, but having never made anything like this before, I followed the pictorial how to that is the picture on the left, above. I, as always, took my own pictures.


I replaced the glue gun with cosmic shimmer glue, this stuff can stick and you only need a little bit and I also used bamboo skewers instead of wire. I also added in my tablet, for some light entertainment during all the cutting and folding and sticking (well, I say light…I was watching videos on gory stage make up tutorials…) I also made myself a template for the petal sizes. I know all petals aren’t identical, but I draw something once and then you’re lucky if the next is even in the same shape spectrum so that just seemed easier. Once I had my piles I started to fold the petals with my fingers. I quickly discovered this wasn’t east and I quickly moved onto a better way to do it so keep reading cause I took that picture with the second rose and I like things to be in order dammat!


Once they’re all rolled and you’ve suddenly realised you need a centre they didn’t tell you about while you were cutting (also see below) you just start wrapping the petals around the stick, gluing them in place. It starts to look like a rose pretty fast. I thought that I could have stopped with size 3, certainly at 4 and possibly 5 was over kill.


I soon found that the base of my petals, sized 4 and 5 at the least, were too big and caused problems when I was trying to wrap them, so I trimmed them off. When I ran out of petals I realised the rose looked pretty amazing and the big droopy petals actually weren’t over kill at all. (yes I know the last two pictures are sideways, but they fit the pattern that way so shhh)
Once I was finished, I was told that you can get cutters you can adapt to make the petals, and I quote “if you’d asked.” because it’s such a normal request…but I’ve seen roses made with heart shapes and I think that may work well too! Keep this in mind, if you have…those fancy dye cutting machines…
SO, then I moved onto picture two, the Calla Lily (personally I don’t like this flower, it seems a little boring. Sorry.) At this point it was quite late at night and I was just giving it a go cause I could.


Colour the blunt end of the bamboo skewer black with a sharpie, or something equally dramatic, cut yourself a curvy teardrop shape, somehow work out how to fold it and then try and stick it down (you may need help from a pencil to poke the middle of the flower until it makes the bowl line shape.) Then hey presto! Calla Lily. I think I could have done with having the wrap around but bigger, so that there was more of a cup bit but ya get what ya make….
Next morning, I remembered that I’d thought he rose was pretty presentable after only petal sizes 1-3 so I decided to try it again. This time I learnt from the first.


Curly the petals with the bamboo stick! haha, you want to curl them out, so that they fold under, almost the opposite way to the way you’ll be folding them round the stick. Next, you’ll need a middle! Basically another petal, sort of like a 1, but I made mine a little longer. U stuck one side to the stick, added glue to the rest and then rolled it around as tightly as possible and then held it till it was dry.


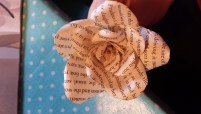
The secret to a perfect rose is to overlap your petals, I know this from making fondant ones, so thought I’d add that in there, also, when adding the bigger petals, folding the bottom in like the middle picture above before adding the glue actually helps it to wrap around better. Once I was done this one seemed under dressed and I was able to see the purpose of all those ‘extra’ petals, so next time I’ll be making the full rose.
Next I just decided to play.


I cut a daisy shape, I’m not sure why, it wont make a daisy, then I cut out four of them, snipped the petals so that they would overlap and curled the petals like I did with the rose. Then I stabbed them in the heart!…and slowly wiggled them up the stick…


All the way to the top! And this one was terrible to glue, I’d advise gluing one at a time on at least the first 2 petal sets, cause they dont stay where you leave them unless they’re dry! Stupid things. After the first two, it’s easier as you’re just sort of gluing the top of one to the bottom of the other, like in picture 3 above. I have no idea what flower this is, it’s kind of weird and I’m just going to ignore it. Like it’s centre petal mostly says, ‘accidental’…
At this point I thought “What the heck.” I got some extra tools and I proceeded to wipe the flowers all over them. Except the calla lily. Didn’t like that one. Besides, this is one of those solemn white ones, haha.

If you intend to do this to your flowers, it’s advisable to do it before you assemble them. Both the edge darkening and the stippling over the petals. Cause you wont get frustrated and just beat the flower with the inkpad…

I had planned to try a few origami ones, but I’ll leave those for another day.
Have you ever made any paper flowers before? What’s your favourite?

